September 08, 2026
Akumina AI Configuration for Content Safety
Akumina AI Configuration for Content Safety
KMWorld Webinar: Oct 15th, 2:00pm ET. Beyond Search: Connecting Employees to Answers and Action (REGISTER)


The Akumina AI Platform is a comprehensive, enterprise-grade AI platform built on .NET 10 and Microsoft Agent Framework. It provides multi-tenant support, intelligent agent orchestration, an extensible plugin architecture, Agent-to-Agent (A2A) protocol support for interoperable agent collaboration, and a Model Context Protocol (MCP) gateway for integrating AI assistants and enterprise systems.
| Capability | Description |
|---|---|
| Multi-Tenant Architecture | Azure AD integration with complete tenant isolation |
| AI Agent Orchestration | Smart routing across Azure OpenAI, OpenAI, Microsoft Foundry, Copilot Studio, and A2A-enabled remote agents. |
| Tools System | Extensible plugins for weather, document search, image generation, stock data, tools using REST API Configuration and more |
| Real-Time Chat | Streaming chat responses via Server-Sent Events (SSE) with full session management |
| Analytics & Reporting | Usage tracking, billing, and comprehensive reporting with 7-year compliance retention |
| MCP Gateway | Expose Akumina APIs as MCP tools for Claude, GitHub Copilot, and other AI assistants |
| Content Safety | Azure Content Safety integration for hate, self-harm, sexual, and violent categories |
| Enterprise Security | JWT bearer tokens, tenant validation, OBO token exchange, and secure API endpoints |
The platform consists of two primary binaries:
| Project | Description |
|---|---|
| Akumina.Ai.Api | RESTful API with multi-tenant JWT authentication, agent orchestration, and plugin management |
| Akumina.Ai.Core | Shared business logic, agent factories, tools, telemetry, and data access services |
End-to-End System Architecture
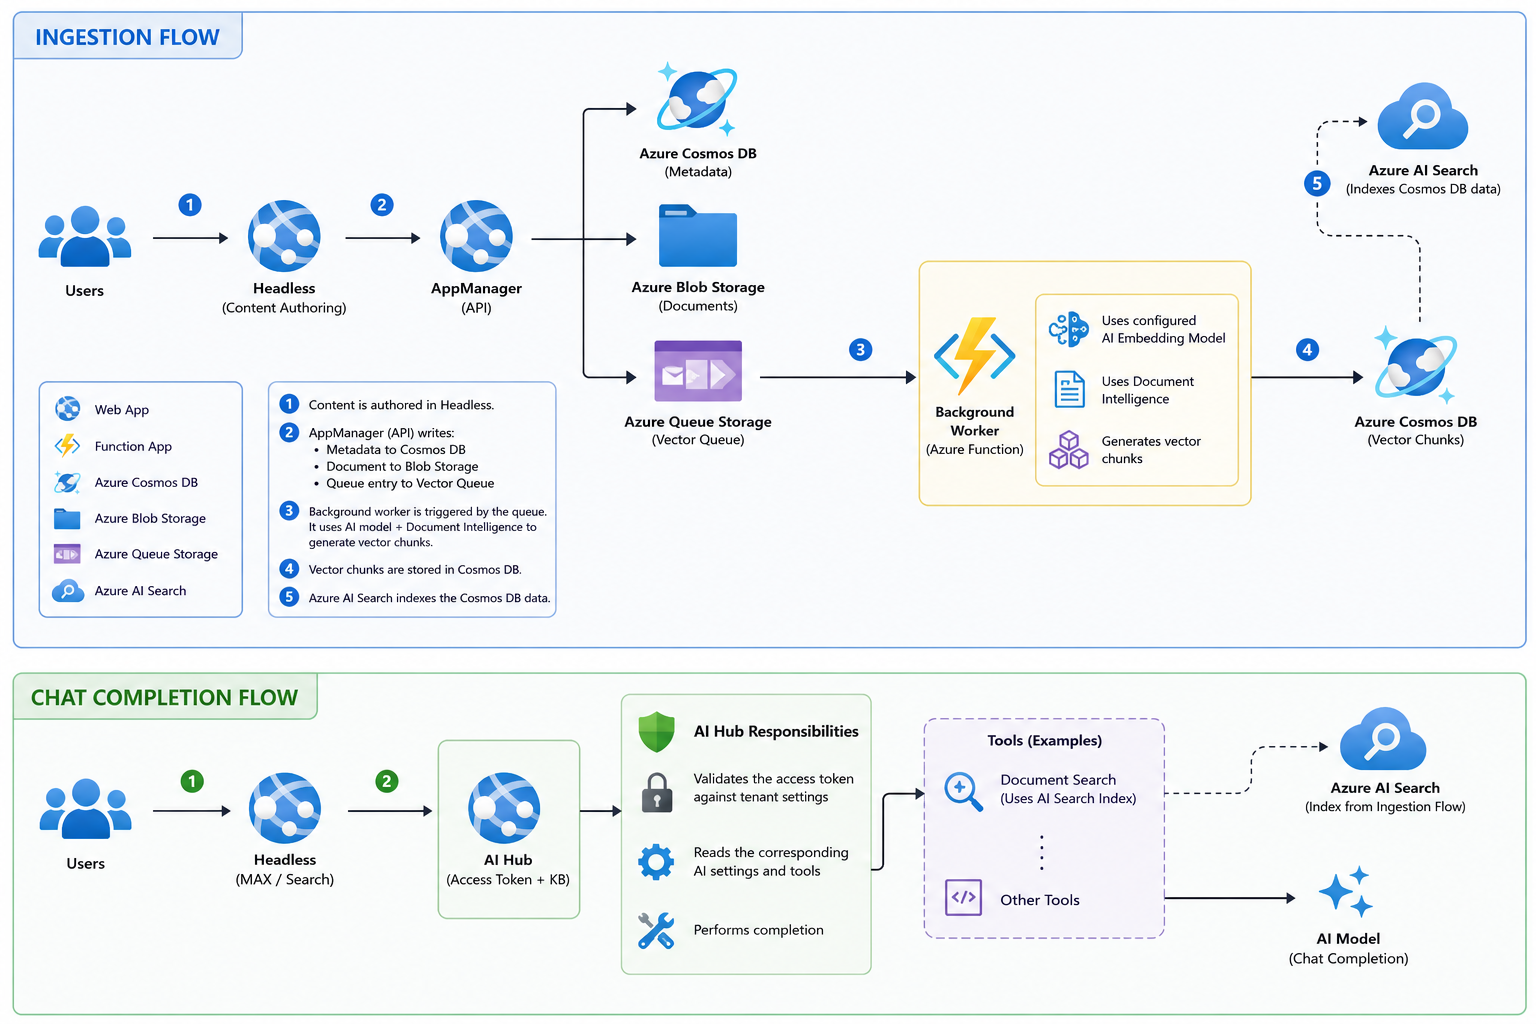
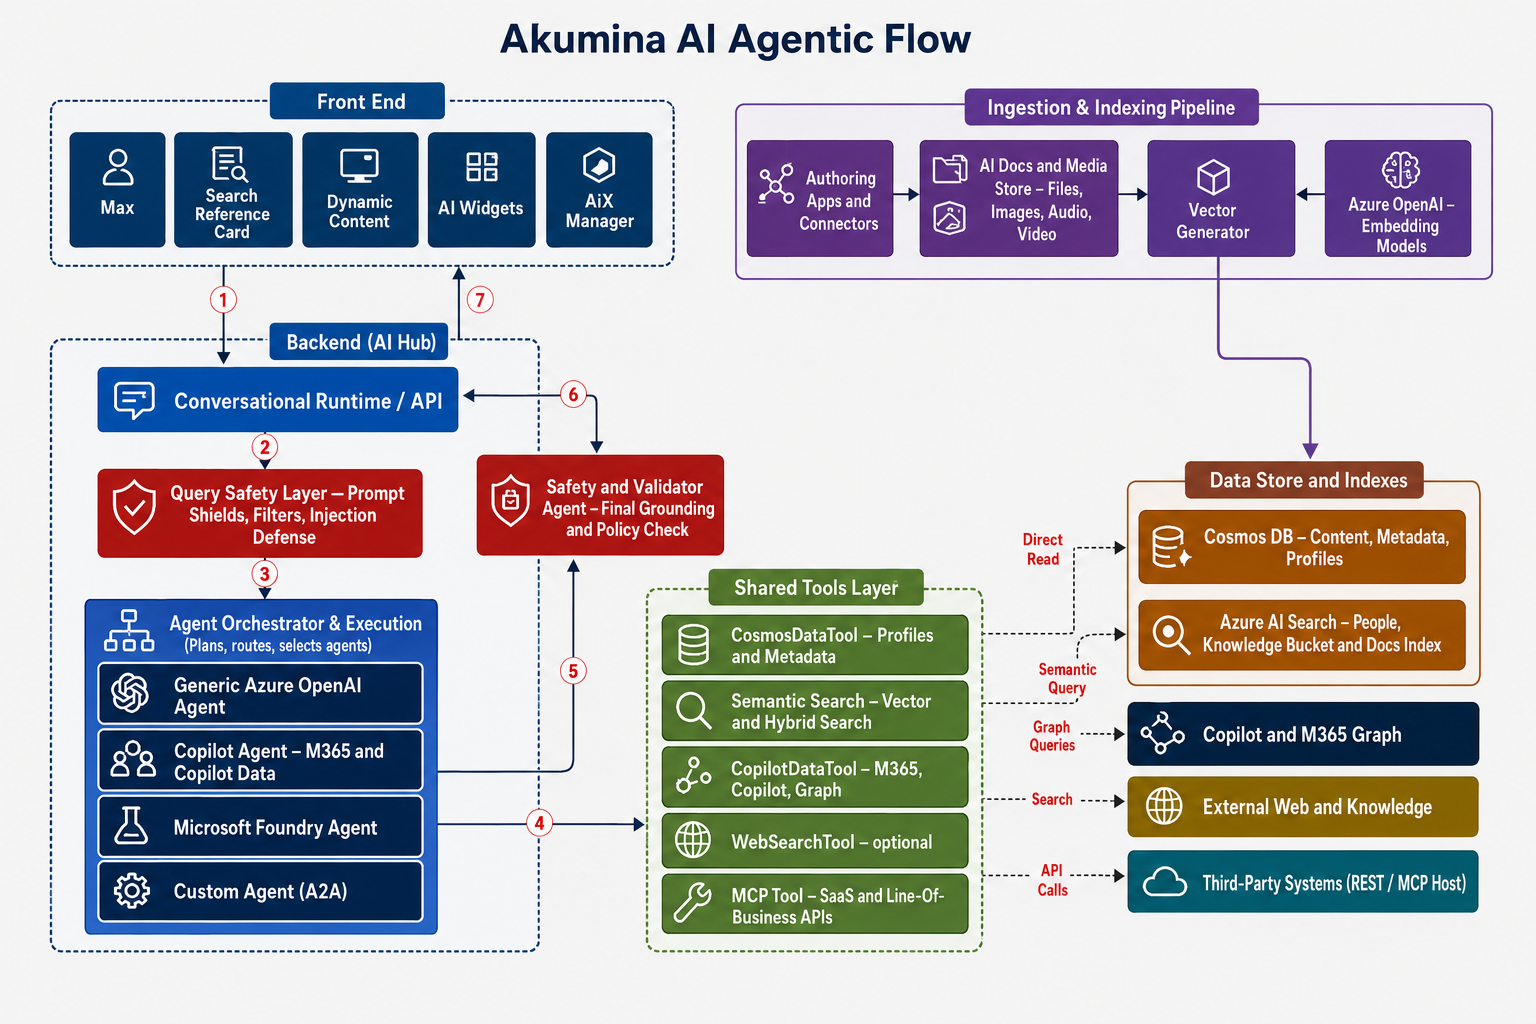
The prerequisites pertain exclusively to self-hosted and single-tenant customers. JSON templates can serve as generic configuration elements for multi-tenancy, self-hosted, and single-tenant environments alike.
| Requirement | Details |
|---|---|
| Operating System | Linux, Windows, or containers running on AMD64 |
| .NET 10; for IIS, install .NET 10 Hosting Bundle | Required for running Akumina.Ai.Api and Akumina.Ai.McpGateway |
| Azure Subscription | Required for Azure OpenAI, Cosmos DB, Azure AI Search, and other Azure services |
| Microsoft Entra ID | Configured tenant with an application registration |
| Azure CLI | Required for infrastructure deployment scripts |
| AI Server binaries (.zip) | AI binary files for self-hosted deployments |
| kv-template.json | Azure Key Vault configuration template |
| ai-config-template.json | API Server tenant configuration template |
| ai-mcp-config-template.json | MCP Server configuration template |
| deploy-cosmos-db.ps1 | PowerShell script for Cosmos DB setup |
| PeopleSync Serverless setup for single tenancy | Setup instructions for the PeopleSync Serverless process used to vectorize people data and documents |
Fill in all values in kv-template.json and store them in keyvault. For development or testing, copy these values directly into appsettings.json or appsettings.<ENV>.json. Refer to the following table for section details, or continue to the next section if not needed.
| Setting | Description |
|---|---|
| ConnectionString | Full Application Insights connection string |
| Setting | Description |
|---|---|
| Endpoint | Search service URL |
| ApiKey | Admin or query key |
| DocumentIndexName | Index name for documents |
| PeopleIndexName | Index name for people |
| ApiVersion | API version (e.g., 2023-11-01) |
| DefaultTopResults | Default number of results to return |
| MaxTopResults | Maximum allowed results |
| DocumentIndexSemanticConfigName | Semantic configuration for document index |
| PeopleIndexSemanticConfigName | Semantic configuration for people index |
| Setting | Description |
|---|---|
| Enabled | Enable/disable caching (true/false) |
| Provider | "Redis" or "InMemory" |
| DefaultTtl | Default expiration (format: HH:MM:SS) |
| MaxCacheEntries | Max entries for InMemory provider |
| CleanupInterval | Cleanup interval for expired entries |
Redis Sub-Settings:
| Setting | Description |
|---|---|
| ConnectionString | Redis connection string |
| InstanceName | Key prefix for all Redis keys (e.g., AkuminaAI:) |
| ConnectTimeout | Connection timeout in milliseconds |
| SyncTimeout | Sync operation timeout in milliseconds |
| AbortOnConnectFail | Continue without caching if Redis fails (false recommended) |
| UseSsl | Enable SSL/TLS (true for Azure Redis, false for local) |
| Setting | Description |
|---|---|
| Enabled | Enable/disable tenant caching |
| CacheTtl | Tenant cache expiration (format: HH:MM:SS) |
| MaxCacheEntries | Maximum cached tenants |
| CacheAllActiveTenantsResult | Cache the full active tenants result set |
| Setting | Description |
|---|---|
| ConnectionString | Primary Cosmos DB connection string |
| DatabaseName | Database name (e.g., akcontainers) |
| SessionsContainerName | Container for chat sessions (default: chatsessions) |
| MessagesContainerName | Container for messages (default: chatmessages) |
| ReportsContainerName | Container for usage and billing (default: chatusage) |
| TenantsContainerName | Container for tenant config (default: settings) |
| SettingsEntityType | Prefix for tenant settings IDs (e.g., AKAI-) |
| MaxThroughput | RU/s throughput |
| DefaultMessageTtl | Message TTL in seconds (default: 31536000 = 1 year) |
| DefaultSessionTtl | Session TTL in seconds (default: 31536000 = 1 year) |
| DefaultReportTtl | Usage report TTL in seconds (default: 7776000 = 90 days) |
| BillingTtl | Billing record TTL in seconds (default: 220752000 = 7 years) |
| CreateIfNotExists | Auto-create containers on startup |
| PreferredRegion | Preferred Azure region |
| EnableDiagnostics | Enable Cosmos DB diagnostics |
| Setting | Description |
|---|---|
| DefaultTimeoutSeconds | Default HTTP request timeout |
| LongRunningTimeoutSeconds | Timeout for long-running operations |
Prerequisites:
The platform uses existing AppManager configured CosmosDB server with the following database and containers:
The platform uses Azure Cosmos DB with the following database and containers:
Container Specifications
| Container | Content | Default TTL | Partition Key Pattern |
|---|---|---|---|
| chatsessions | Chat session metadata | 1 year (31,536,000s) | user_{userId} |
| chatmessages | Individual chat messages | 1 year (31,536,000s) | session_{sessionId} |
| chatusage | Usage reports & billing records | 90 days (7,776,000s) | reports_{reportType} / billing_{tenantId} |
Container Script
Use the provided PowerShell script to automate Cosmos DB container creation:
.\deploy-cosmos-db.ps1 `
  -ResourceGroup "your-resource-group" `
  -CosmosAccountName "your-cosmos-account" `
  -DatabaseName "akcontainers" `
  -TenantId "your-tenant-id"
Parameters:
| Parameter | Description | Default |
|---|---|---|
| ResourceGroup | Azure resource group name | rg-udai |
| Location | Azure region | East US 2 |
| CosmosAccountName | Cosmos DB account name | cosmos-udaidemo |
| DatabaseName | Database name | akcontainers |
| TenantId | Azure AD tenant ID for sample config | — |
The script performs:
When utilizing Virtual Machines or Azure App Services, transfer the binary downloads to the webroot and confirm that your runtime is configured to support .NET 10. For containerized environments, deployment can be executed directly from the hub, if available.
Open the appsettings.json file and update the Key Vault Secret URI accordingly. If you did not create a Key Vault, insert the JSON content provided in the Key Vault Section into appsettings.json.
{
  "KeyVault": {
    "Uri": "https://kv-udaidemo1.vault.azure.net/secrets/ai",
    "ManagedIdentityClientId": ""
  }
}
To configure agents and settings, access the Microsoft Azure portal and provision Microsoft Foundry. After Foundry is available, retrieve the required configuration values and add them to the provided ai-config-template.json file. Complete this setup before proceeding.
Once Microsoft Foundry is provisioned, deploy a compatible chat completion/response model. The supported model depends on your version:
7.0.2602.0316 or later, you can use any latest model that supports the Chat Completions APIs, such as GPT-5.5, Grok 4.3, or another compatible model.Both gpt-image-1.5 or later and text-embedding-3-large are also required. Model availability may change over time, so select the latest compatible model supported by your provider. If you are processing any complex document other than the TXT type then you must enable EmbeddingConfiguration using Document Intelligence service.
Go to AppManager → Central Site → Settings → AI Settings to configure agents and settings. Use the JSON template ai-config-template.json to update values; after saving and reloading, the configured tools will appear. The template includes all supported agents, but you only need the generic agent and its configurations to start—many elements in the file are optional.
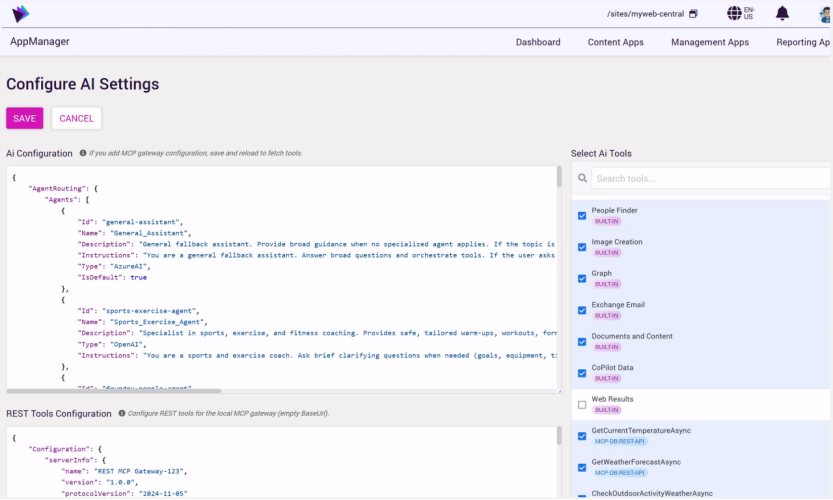
You can integrate these optional built-in tools with AzureAI or OpenAI-based Akumina Agents. Since they connect to third-party APIs, you'll need accounts from those providers. These tools are built-in code solutions, but you can replace them or add your own tools to connect to any REST API. For setup, see the MCP REST API configuration section.
| Parameter | Description | Default |
|---|---|---|
| Weather | Retrieve Current Weather Conditions. Obtain an API key from OpenWeatherMap. |
|
| Stock | Retrieve stock price with ticker; obtain AlphaVantage key. |
|
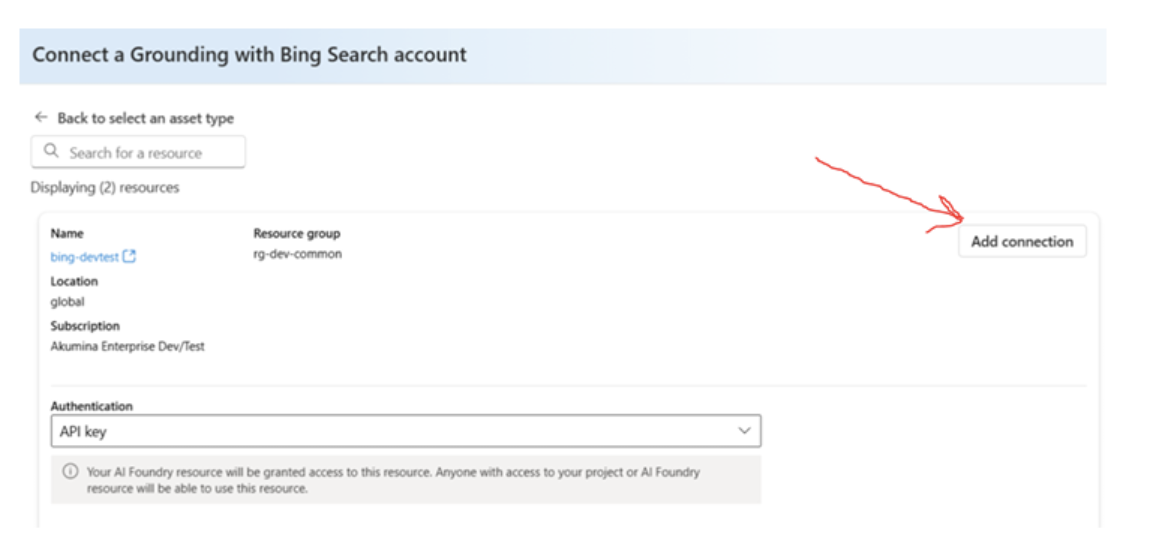
| BingGrounding | Searches online for up-to-date information. Builds a Microsoft Foundry Agent using Bing Grounding. |
Include the BingGrounding Agent within the Agent section, and then configure BingGrounding to reference the designated Agent Name.
|
| Dispatches Email |
Provide SMTP settings for supported providers.
|
BingGrounding Steps -
If you plan to use Microsoft Copilot Studio agents, additional configuration is required.
Step 1: Enable Power Platform API
Run the following PowerShell commands to enable the Power Platform API service principal:
# Connect to Microsoft Graph
Connect-MgGraph

# Create the Power Platform API service principal
New-MgServicePrincipal -AppId "8578e004-a5c6-46e7-913e-12f58912df43"
Step 2: Add API Permission
Step 3: Get the DirectConnectUrl
Step 4: Enable Power Platform API
In your ai-config-template.json, add or update the Copilot Studio agent configuration:
{
  "Id": "copilot-studio-agent",
  "Name": "Copilot Studio Agent",
  "Type": "CopilotStudio",
  "ConnectionSettings": {
    "DirectConnectUrl": "<YOUR_DIRECT_CONNECT_URL>"
  }
}
A2A (Agent-to-Agent) support lets the Akumina AI platform connect to any A2A-protocol-enabled remote agent and use it exactly like a built-in agent. A remote agent can respond to messages on its own (single-agent chat) or take part in multi-agent workflows (orchestration) alongside your other agents.
Under the hood, Akumina resolves the remote agent's Agent Card from its well-known discovery endpoint (/.well-known/agent-card.json) and wraps it as a standard agent. Because it becomes a normal platform agent, it automatically flows through agent routing, caching, and every orchestration strategy — Sequential, Concurrent, GroupChat, and Human-in-the-Loop — with no extra configuration.
Add an entry with "Type": "A2A" to the AgentRouting.Agents section of your AI configuration:
{
  "Id": "a2a-agent",
  "Name": "A2A Remote Agent",
  "Type": "A2A",
  "SupportsRuntimeTools": false,
  "Description": "A remote agent exposed via the A2A protocol",
  "Instructions": "You are a remote A2A protocol enabled agent.",
  "ConnectionSettings": {
    "AgentUrl": "<A2A_AGENT_BASE_URL>",
    "AuthMode": "None"
  }
}
| Setting | Required | Default | Description |
|---|---|---|---|
| AgentUrl | Yes | — | Base URL of the A2A-enabled remote agent |
| AgentCardPath | No | /.well-known/agent-card.json | Path to the Agent Card discovery document |
| TimeoutSeconds | No | 120 | HTTP timeout for A2A calls |
| AuthMode | No | None | Authentication mode used to call the remote agent (see below) |
Each setting is resolved in this order: the agent's own ConnectionSettings, then a global A2A configuration section, then the built-in default.
| AuthMode | Behavior |
|---|---|
| None | No authentication. Requests are sent to the remote agent without any credentials. |
| PassThrough | The incoming access token is forwarded to the remote agent, so the agent runs with the caller's identity/permissions. |
Browse to the following address, replacing <end-point> with the public host name of your deployed application:
https://<end-point>/.well-known/agent-card.json
A successful response should return the agent-card JSON generated by the sample application. Resolve any deployment, routing, or configuration errors before registering the agent in AppManager.
If you are using an Agent Card based on an A2A specification version earlier than v1.0, the Akumina A2A agent configuration will fail. This is by design. Akumina supports A2A v1.0 and later only, because the v1.0 specification introduced breaking changes that are not backward-compatible with earlier Agent Card formats.
Download or open the agent's Agent Card and confirm that the supportedInterfaces property is present. In A2A v1.0, supportedInterfaces is required and identifies the endpoint, protocol binding, and protocol version supported by the agent.
For example:
"supportedInterfaces": [
  {
    "url": "https://your-agent.example.com/",
    "protocolBinding": "JSONRPC",
    "protocolVersion": "1.0"
  }
]
If supportedInterfaces is missing and the card instead relies on the older top-level url and protocolVersion fields, the Agent Card is likely based on a pre-v1.0 A2A specification and will not be accepted by Akumina.
The MCP (Model Context Protocol) Server enables extensible tool integration for your AI agents.
In your tenant configuration (ai-config-template.json), add the MCP Gateway settings:
{
  "McpGateways": [
    {
      "Name": "default",
      "Enabled": true,
      "BaseUrl": "",
      "TimeoutSeconds": 30,
      "ForwardAuthorization": true
    }
  ]
}
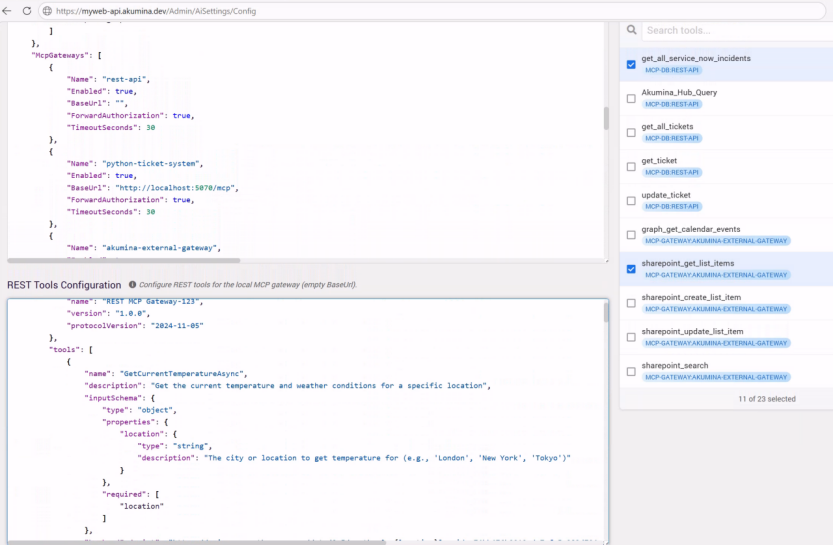
Add your MCP server under McpGateways, then save.
{
  "McpGateways": [
    {
      "Name": "default",
      "Enabled": true,
      "BaseUrl": "<YOUR_MCP_SERVER_URL>",
      "TimeoutSeconds": 30,
      "ForwardAuthorization": true
    }
  ]
}
Publishing a Microsoft Foundry (Azure OpenAI) endpoint through Azure API Management (APIM) lets client applications call Foundry through a managed gateway rather than directly. Using APIM in front of Foundry gives you a single entry point where you can enforce subscription keys, apply token-based rate limits, emit usage metrics, and swap or scale backends without changing client code. This covers the modern Foundry v1 API surface (the /openai/v1 path), including both the correct configuration and the common errors you may encounter along the way, with the fix for each.
A client request passes through two distinct stages inside APIM. Understanding this ordering is the key to diagnosing most problems:
Because policies run only after matching succeeds, a policy cannot rescue a URL that matched no operation. This single rule explains the difference between a 404 (path problem) and a 401/500 (auth or policy problem).
In the APIM portal, add a new API using the Azure AI Foundry / Azure OpenAI option (not the plain Backend option). This import does three things for you automatically:
On the API's Settings tab, note these values — clients build their URL from them:
| Setting | Example value | Notes |
|---|---|---|
| API URL suffix | myapifoundry | The path segment that routes to this API. |
| Base URL | https://<apim-host>.azure-api.net/myapifoundry | Gateway host + suffix. Clients append the operation path to this. |
| Subscription required | Checked (recommended) | Leave enabled — the AI-gateway policies depend on the subscription context. |
| Subscription header name | api-key | The header APIM reads the subscription key from. May differ from the default. |
| Subscription query name | subscription-key | Alternative way to pass the key, as a query string parameter. |
The AI Foundry import creates operations from the Foundry OpenAPI specification. Because this solution uses the Microsoft Agent Framework (MAF) to connect to Foundry agents and models, and MAF calls Foundry over the fixed /openai/v1 path, each operation path defined during import is strictly required and must match exactly. On the Design tab, confirm the operations below exist. If the client calls a path that does not exactly match an operation's URL template, add an operation for that path and map it to the backend path with a rewrite-uri, applied at the operation scope — never at the API level, which would rewrite every operation.
The import creates the chat completion operation (POST /openai/v1/chat/completions). On the Design tab, confirm this operation exists. If the client calls a path that does not exactly match this operation's URL template, add an operation for that path and map it to the backend path with a rewrite-uri at the operation scope:
<!-- On the target operation, Inbound processing -->
<inbound>
  <base />
  <rewrite-uri template="/openai/v1/chat/completions" />
  <set-body>@{
      var body = context.Request.Body.As<JObject>(preserveContent: true);
      if (body["max_tokens"] != null)
      {
          body["max_completion_tokens"] = body["max_tokens"];
          body.Remove("max_tokens");
      }
      // Reasoning models only allow the default temperature (1)
      if (body["temperature"] != null && (double)body["temperature"] != 1)
      {
         body.Remove("temperature");
      }
      return body.ToString();
  }</set-body>
</inbound>
The <base /> pulls in the API-level policy (backend selection, metrics, rate limit); placing rewrite-uri after it rewrites only the outgoing path, after the backend is selected.
Newer Foundry models — the reasoning and GPT-5-class deployments — reject the legacy max_tokens parameter and return HTTP 400; they expect max_completion_tokens instead. The set-body policy above rewrites the request body before it is forwarded, renaming max_tokens to max_completion_tokens. The preserveContent: true flag lets the body be read here and still forwarded downstream, and the null check means requests that already send max_completion_tokens (or send neither) pass through untouched — so the same operation works for every model, not only the ones that break. JObject comes from Newtonsoft.Json.Linq, which is available in APIM policy expressions by default, so no extra configuration is needed.
Image generation is a separate Foundry endpoint, so the import does not add it as a chat operation. Add a new operation for it on the Design tab. Create a POST operation named Creates an image completion, set its frontend URL template to image/generation, and add an inbound processing policy that rewrites the path to the Foundry image-generation endpoint at the operation scope:
<!-- On the "Creates an image completion" operation, Inbound processing -->
<inbound>
  <base />
  <rewrite-uri template="/openai/v1/images/generations" />
</inbound>
As with chat completion, the <base /> pulls in the API-level policy (backend selection, metrics, rate limit), and placing rewrite-uri after it rewrites only the outgoing path so the request reaches /openai/v1/images/generations on the Foundry backend. Complete both mappings before running the curl verification in the "Passing the key with AdditionalHeaders" section.
Audio transcription (speech-to-text) is a separate Foundry endpoint, and it behaves differently from chat and embeddings: the /openai/v1 audio route does not resolve the deployment from the request body, so the deployment must be named explicitly in the backend path (/openai/deployments/{deployment}/audio/transcriptions). The import therefore does not add an audio operation. Add a single operation that handles every audio model — Whisper and the gpt-4o-transcribe family alike — by having the client pass the target deployment as a deploymentId query parameter, which the inbound policy injects into the backend path.
On the Design tab, add a new POST operation named Creates an audio transcription. Under Frontend, set the POST URL template (the frontend URI) to openai/v1/audio/transcriptions. Still under Frontend, add a query parameter named deploymentId (type string, required); clients supply the target audio deployment with it — for example, ?deploymentId=whisper or ?deploymentId=gpt-4o-transcribe.
In Inbound processing for this operation, add the following inside <inbound>. It reads the deploymentId query value, rejects the request with HTTP 400 if it is missing, and rewrites the path to the classic deployment-in-path audio route the Foundry backend expects:
<!-- On the "Creates an audio transcription" operation, Inbound processing -->
<inbound>
    <base />
    <set-variable name="deploymentId" value="@(context.Request.Url.Query.GetValueOrDefault("deploymentId", string.Empty))" />
    <choose>
        <when condition="@(string.IsNullOrEmpty((string)context.Variables["deploymentId"]))">
            <return-response>
                <set-status code="400" reason="Missing deploymentId" />
            </return-response>
        </when>
    </choose>
    <rewrite-uri template="@("/openai/deployments/" + (string)context.Variables["deploymentId"] + "/audio/transcriptions?api-version=2025-04-01-preview")" copy-unmatched-params="false" />
</inbound>
As with the chat and image operations, <base /> runs first so the backend is selected and the AI-gateway policies (metrics, rate limit) apply before the path is rewritten. The set-variable reads deploymentId from the query string; the choose returns HTTP 400 when it is missing, so a misconfigured client fails fast instead of being routed to a wrong or empty path. The rewrite-uri builds the classic deployment-in-path audio route and pins the api-version, while copy-unmatched-params="false" stops the client's deploymentId (and any other query parameters) from being appended to the backend URL after the api-version. Because a single operation serves every audio model, adding a new audio deployment later needs no APIM change — the client simply passes its name as deploymentId.
A note on the api-version: the rewrite pins a dated api-version (2025-04-01-preview) that the gpt-4o-transcribe family requires and that Whisper also accepts. Azure publishes newer api-versions over time and retires older preview versions, so this value should be reviewed periodically and updated to a current version — use the newest version shown in the deployment's sample code in Foundry and confirm your models still transcribe on it. Because deploymentId is spliced into the backend path, it is also good practice to validate it against your known deployment names in the choose block before use.
Verify with curl. Audio transcription is a multipart upload, so send the file as form data and pass the deployment in the query. On Windows cmd.exe:
curl -X POST "https://<apim-host>.azure-api.net/<suffix>/openai/v1/audio/transcriptions?deploymentId=whisper" ^
   -H "api-key: <APIM-SUBSCRIPTION-KEY>" ^
   -F "file=@sample.wav"
Swap deploymentId=gpt-4o-transcribe (and model=gpt-4o-transcribe) to validate another model through the same operation. A 200 response with transcribed text confirms the operation, query parameter, and rewrite are correct. Note the 25 MB per request limit on the audio models. This applies to both APIM and direct Microsoft Foundry calls.
If a browser-based client (for example, a single-page app or an in-page widget) calls the gateway from a web origin, the browser first sends a preflight OPTIONS request. Recall from "How a request flows" that operation matching (Stage 1) runs before any policy. The cors policy is the exception: when placed in the API-level (All operations) inbound section, APIM intercepts the preflight, answers it directly with the allowed origins, methods, and headers, and never forwards it to Foundry. Without this, the browser blocks the response even when the underlying POST would succeed — and a raw curl or the Test blade will pass while the browser fails, because curl and the Test blade do not enforce CORS.
Add the policy at the API level so it applies to every operation. Place it after <base /> in the inbound section, alongside the backend selection and rate-limit policies:
<!-- API level (All operations), Inbound processing -->
<inbound>
  <base />
  <cors allow-credentials="false">
    <allowed-origins>
      <origin>*</origin>
    </allowed-origins>
    <allowed-methods preflight-result-max-age="300">
      <method>OPTIONS</method>
      <method>POST</method>
    </allowed-methods>
    <allowed-headers>
      <header>*</header>
    </allowed-headers>
  </cors>
  <!-- existing backend selection, token metrics, and rate-limit policies follow -->
</inbound>
The <allowed-origins> block is where you declare the client (redirect) URLs permitted to call the gateway. The wildcard <origin>*</origin> above accepts any origin and is convenient for testing, but in production replace it with the exact origins of your app — for example, <origin>https://your-tenant.akumina.com</origin> — listing one <origin> element per site. Keep allow-credentials="false" when using the wildcard origin, because browsers reject a wildcard combined with credentialed requests; only set it to "true" if you list explicit origins and genuinely need cookies or credentialed calls. The <allowed-headers> block must include api-key (the APIM subscription header from the "Confirm the API settings" section), Authorization (sent by the OpenAI SDK), and Content-Type; add any other custom headers your client sends.
Point your client at the APIM gateway and send the subscription key in the header APIM expects. Four things must be correct:
| Item | Correct value |
|---|---|
| Base URL | https://<apim-host>.azure-api.net/<suffix>/openai/v1 |
| Auth header | api-key: <APIM subscription key> (not Ocp-Apim-Subscription-Key on this instance) |
| Model | The deployment name in the request body, e.g. gpt-5.5 |
| api-version | Not required for the v1 GA API — omit it |
Even when the APIM subscription header is named api-key, the OpenAI SDK by default sends its key as Authorization: Bearer <key>. APIM never sees a key in the api-key header and returns 401. You must send the subscription key explicitly in the api-key header.
In the Akumina AI configuration you supply the subscription key — and any other headers the gateway requires — through an AdditionalHeaders section rather than relying on the SDK's default Authorization header. Configure AdditionalHeaders as part of every external agent definition, and use the same mechanism for the other AI configurations (for example, AzureOpenAI). This is what actually sends the api-key header described in the "Why the header name matters" section, so a request reaches the gateway with the subscription key APIM expects:
"AdditionalHeaders": {
  "api-key": "<APIM_SUBSCRIPTION_KEY (optional, only when the Azure AI Foundry endpoint is fronted by a gateway/APIM)>"
}
The api-key entry is optional: include it only when the Foundry endpoint is fronted by a gateway/APIM. When you call Foundry directly it is not needed. The header name must match the APIM subscription header confirmed in the "Confirm the API settings" section (the AI Foundry import typically names it api-key rather than the default Ocp-Apim-Subscription-Key), and its value is the APIM subscription key. You can add further entries to AdditionalHeaders for any other custom headers your gateway requires; make sure each one is also listed in the CORS <allowed-headers> block from the "Enable CORS for browser clients" section. Per the security notes, keep these keys out of source control and shared documents — supply them through your secret store or environment configuration.
Use curl to confirm the gateway independently of your application. On Windows cmd.exe, wrap the body in double quotes and escape the inner quotes (single quotes are not string delimiters in cmd and will corrupt the JSON):
curl -X POST "https://<apim-host>.azure-api.net/<suffix>/openai/v1/chat/completions" ^
  -H "api-key: <APIM-SUBSCRIPTION-KEY>" ^
  -H "Content-Type: application/json" ^
  -d "{\"model\":\"gpt-5.5\",\"messages\":[{\"role\":\"user\",\"content\":\"hi\"}]}"
Check if <APPURL>/health returns 200, then look for additional errors.
| Issue | Possible Cause | Resolution |
|---|---|---|
| 401 Unauthorized | Invalid or expired token, token audience (aud) mismatch, incorrect Microsoft Entra ID configuration, or one or more required dependency services are unavailable or configured incorrectly |
Verify the Microsoft Entra ID configuration, API permissions, token audience, and credentials. Check Application Insights logs, then open <APPURL>/health/ready to confirm that all required dependency services—including Cosmos DB, Azure AI Search, Microsoft Foundry, Key Vault, and any other configured services—are available and configured correctly. |
| 404 Not Found | Incorrect endpoint URL | Confirm the AI service URL, endpoint path, and tenant ID. |
| Chat Not Responding | AI model configuration issue, model deployment unavailable, or quota exceeded | Verify the Microsoft Foundry model deployment, endpoint, credentials, model availability, configuration, and quota limits. |
| Dependency Service Access Denied or Connection Timeout | Virtual network, firewall, private endpoint, or selected-IP access rules are blocking connectivity | If the dependency services are protected by a virtual network, ensure that the Akumina AI service is configured to access the required virtual network and private endpoints. In a non-virtual-network environment that uses selected-IP firewall rules, add the outbound IP addresses of both the Akumina AI service and PeopleSync services to the allowed IP list for Cosmos DB and any other protected dependency services. |
The symptoms below follow the order most teams hit them. Work top to bottom.
| Symptom | Root cause | Fix |
|---|---|---|
| 404 – works in Test blade, fails from code | The client URL does not match any defined operation. The Test blade sends the operation's exact path; the client sends a different one. | Point the client at .../<suffix>/openai/v1 so the request resolves to POST /openai/v1/chat/completions. Confirm the matched path in the APIM trace. |
| 404 – short path (.../<suffix>/chat/completions) | No operation is defined for that path. Policies cannot rewrite an unmatched path. | Either point base_url at the full /openai/v1 path, or add an operation for the short path and add a rewrite-uri in that operation's policy (see "Verify the operations and map the request paths"). |
| 400 – bad request | Model request contains unsupported payload | Check your payload, then use the APIM Test tab to confirm that it contains only supported arguments. |
| 401 – Access denied due to missing subscription key | The key is not in the header APIM checks (e.g. sent as Authorization: Bearer or Ocp-Apim-Subscription-Key instead of api-key). | Send the APIM subscription key in the api-key header. Confirm the header name on the Settings tab. |
| 500 – llm-token-limit ExpressionValueEvaluationFailure / Object reference not set | Subscription required was disabled, so context.Subscription is null and the token-limit / metric policies fail. | Re-enable Subscription required. If you truly need keyless access, change counter-key and the metric dimension to a non-subscription value. |
| 500 – internal_server_error from the model | Malformed JSON body — commonly caused by cmd.exe single-quote handling corrupting the payload. | On Windows, use escaped double quotes or -d @body.json. Then confirm the deployment name and, if needed, test Foundry directly to isolate. |
Application logs are available in Azure Application Insights. Use the following query to view recent errors:
exceptions
| where timestamp > ago(24h)
| project timestamp, type, outerMessage
| order by timestamp desc
If you are upgrading from prior version to 7.0.2602.0316 or later, please update your config after the upgrade.